
Day 2: Merge Two Sorted Lists - leetcode - Python3

 You are given the heads of two sorted linked lists list1 and list2.

Merge the two lists in a one sorted list. The list should be made by splicing together the nodes of the first two lists.

Return the head of the merged linked list.


Example 1:

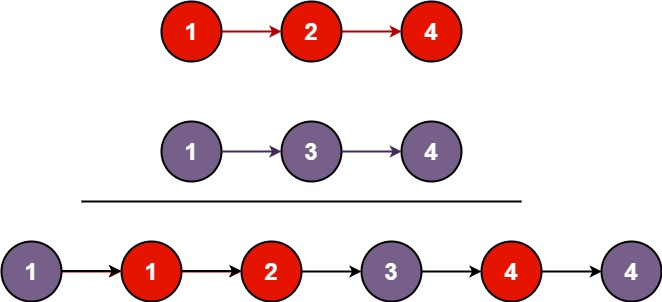
Input: list1 = [1,2,4], list2 = [1,3,4]
Output: [1,1,2,3,4,4]

Example 2:

Input: list1 = [], list2 = []
Output: []

Example 3:

Input: list1 = [], list2 = [0]
Output: [0]


Constraints:

  • The number of nodes in both lists is in the range [0, 50].
  • -100 <= Node.val <= 100
  • Both list1 and list2 are sorted in non-decreasing order.
SOLUTION:
  • Time complexity:

O(n+m)O(n + m), where n and m are the lengths of list1 and list2

# Definition for singly-linked list.
# class ListNode:
#     def __init__(self, val=0, next=None):
#         self.val = val
#         self.next = next
class Solution:
    def mergeTwoLists(self, list1: Optional[ListNode], list2: Optional[ListNode]) -> Optional[ListNode]:
        # Check if either list is null
        if not list1:
            return list2
        if  not list1:
            return list2
        #declare head, head is a dummy node with a value of 0, and
current is used to keep track of the current position in the merged list.
        head: Optional[ListNode] = ListNode(0)
        current: Optional[ListNode] = head
        while list1 and list2: #loop until the lists are empty

            if list1.val <= list2.val:
                current.next = list1
                list1 = list1.next #changing the pointer function


            else:
                current.next = list2
                list2 = list2.next #changing the pointer function

            current = current.next # changing the current position to the newest inside the iteration

        if list1:
            current.next = list1
        if list2:
            current.next = list2
       
        return head.next

  1. The function mergeTwoLists takes two linked lists as input parameters: list1 and list2. It returns the merged sorted linked list.

  2. The initial checks if not list1: and if not list2: handle the case where either list1 or list2 is empty. If one of the lists is empty, the function simply returns the other non-empty list. This is because merging an empty list with a non-empty list would result in the same non-empty list.

  3. The variables head and current are declared and initialized. head is a dummy node with a value of 0, and current is used to keep track of the current position in the merged list.

  4. The condition while list1 and list2: Checks if both list1 and list2 are not empty. In a singly-linked list, an empty list is represented by None, so this condition ensures that the loop continues as long as there are still nodes to process in both list1 and list2. This loop iterates through the lists and merges the nodes based on their values.

  5. Inside the loop, the code compares the values at the current nodes of list1 and list2. If the value of list1.val is less than or equal to the value of list2.val, the current node of list1 should come first in the merged list.

    • current.next = list1 sets the next attribute of the current node to list1, effectively appending list1 to the merged list.
    • list1 = list1.next moves the list1 pointer to the next node in list1.
  6. If the value of list2.val is less than the value of list1.val, the current node of list2 should come first in the merged list. The process is similar to the above case but with list2.

  7. After setting the next node in the merged list, current is updated to current.next to move the pointer to the newly added node.

  8. Once either list1 or list2 becomes empty, the loop terminates.

  9. If there are remaining nodes in list1, they are appended to the merged list by setting current.next = list1.

  10. If there are remaining nodes in list2, they are appended to the merged list by setting current.next = list2.

  11. Finally, the head of the merged list (excluding the dummy node) is returned as head.next.

Comments

Popular posts from this blog

Bug Boundy Methodology, Tools & Resources

Start by defining a clear objective, such as exploiting a remote code execution (RCE) vulnerability or bypassing authentication on your target. Then, consider how you can achieve this goal using various attack vectors like XSS, SSRF, or others - these are simply tools to help you reach your objective. Use the target as how a normal user would, while browsing keep these questions in mind: 1)How does the app pass data? 2)How/where does the app talk about users? 3)Does the app have multi-tenancy or user levels? 4)Does the app have a unique threat model? 5)Has there been past security research & vulnerabilities? 6)How does the app handle XSS, CSRF, and code injection?

Install & set up mitmweb or mitmproxy in Linux

Step 1: Go to the mitmproxy page and download the binaries. Step 2: Install the downloaded tar file with the command " tar -xzf <filename>.tar.gz " Step 3: In the FoxyProxy add the proxy 127.0.0.1:8080  and turn it on. Step 4 : In the terminal run command " ./mitmweb " Step 5: Go to the page  http://mitm.it/   and download the mitmproxy's Certificate. Step 6: If you downloaded the certificate for Firefox, then go to " settings -> Privacy & Security -> Click View Certificates -> Click  Import ", then import the certificate.  Step 7: Now you are ready to capture the web traffic. Step 8 : In terminal run " ./mitmweb"

pip error in Kali Linux: error: externally-managed-environment : SOLVED

 error: externally-managed-environment × This environment is externally managed ╰─> To install Python packages system-wide, try apt install     python3-xyz, where xyz is the package you are trying to     install.     If you wish to install a non-Kali-packaged Python package,     create a virtual environment using python3 -m venv path/to/venv.     Then use path/to/venv/bin/python and path/to/venv/bin/pip. Make     sure you have pypy3-venv installed.     If you wish to install a non-Kali-packaged Python application,     it may be easiest to use pipx install xyz, which will manage a     virtual environment for you. Make sure you have pipx installed.     For more information, refer to the following:     * https://www.kali.org/docs/general-use/python3-external-packages/     * /usr/share/doc/python3.12/README.venv note: If you believe this is a mistake, please contac...