
Install & setup Genymotion for APK Dynamic Analysis in MobSF in Linux

  1. Download Genymotion  .bin file

  2. Type command:  chmod +x filename.bin
  3.                             ./filename.bin

  4. Create an account in Genymotion website.
  5. Log in to the the App.
  6. Click the "+" button on the top and add a device(phone model).


  7. Run this command in terminal:
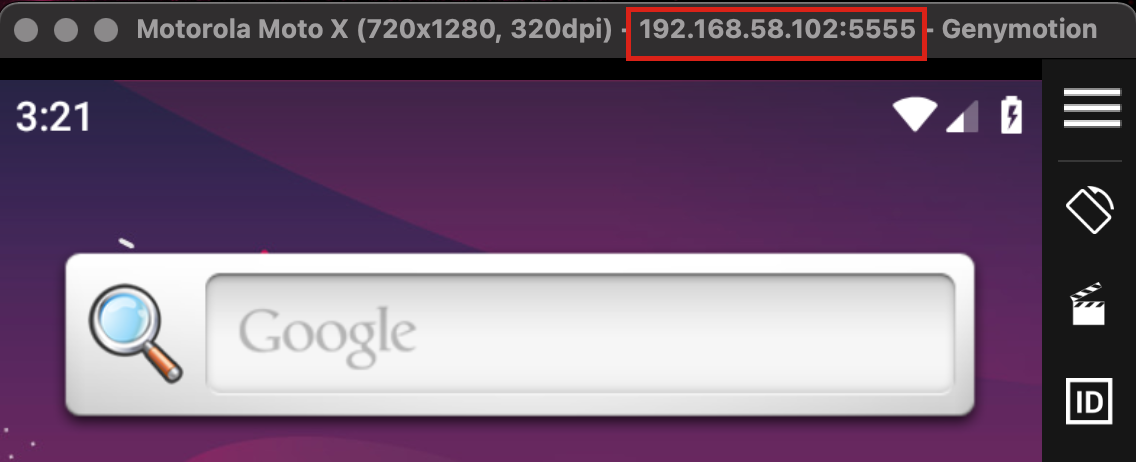
    "docker run -it --rm \ -p 8000:8000 \ -p 1337:1337 \ -e MOBSF_ANALYZER_IDENTIFIER=<adb device identifier> \ opensecurity/mobile-security-framework-mobsf:latest"
  8. In the <adb device identifier>  add your value at his  place  

  9. docker run -it --rm \ -p 8000:8000 \ -p 1337:1337 \ -e MOBSF_ANALYZER_IDENTIFIER=192.168.58.102:5555 \ opensecurity/mobile-security-framework-mobsf:latest
  10. Press enter.

Comments

Popular posts from this blog

Bug Boundy Methodology, Tools & Resources

Start by defining a clear objective, such as exploiting a remote code execution (RCE) vulnerability or bypassing authentication on your target. Then, consider how you can achieve this goal using various attack vectors like XSS, SSRF, or others - these are simply tools to help you reach your objective. Use the target as how a normal user would, while browsing keep these questions in mind: 1)How does the app pass data? 2)How/where does the app talk about users? 3)Does the app have multi-tenancy or user levels? 4)Does the app have a unique threat model? 5)Has there been past security research & vulnerabilities? 6)How does the app handle XSS, CSRF, and code injection?

Install & set up mitmweb or mitmproxy in Linux

Step 1: Go to the mitmproxy page and download the binaries. Step 2: Install the downloaded tar file with the command " tar -xzf <filename>.tar.gz " Step 3: In the FoxyProxy add the proxy 127.0.0.1:8080  and turn it on. Step 4 : In the terminal run command " ./mitmweb " Step 5: Go to the page  http://mitm.it/   and download the mitmproxy's Certificate. Step 6: If you downloaded the certificate for Firefox, then go to " settings -> Privacy & Security -> Click View Certificates -> Click  Import ", then import the certificate.  Step 7: Now you are ready to capture the web traffic. Step 8 : In terminal run " ./mitmweb"

CISCO devises configuration commands & info CCNA 200–301

  Repository with all the labs and necessary screenshots: GitHub — AdithyakrishnaV/CCNA_200–301: CCNA 200–301 Practical LABS. CCNA (Cisco Certified Network… CCNA 200–301 Practical LABS. CCNA (Cisco Certified Network Associate) is an information technology (IT) certification… github.com Configure the hostname : Router>en Router #conf t Router (config) #hostname R1 R1 (config)# en  is the shortcut for  enable  command. “ennable” is used to enter Privileged EXEC mode conf t  is the shortcut for  configure terminal command. Used to enter the global configuration mode delete or remove Just put a no in front, it is same across all devices. R1(config)#no interface g0 /0.20 show ip interface Checks the status of the interfaces R1(config) #do show ip interface brief Interface IP-Address OK? Method Status Protocol GigabitEthernet0/0 unassigned YES unset administratively down down GigabitEthernet0/1 unassigned ...